docker container image is a lightweight, standalone, executable package of software that includes everything needed to run an application: code, runtime, system tools, system libraries and settings.
Container images become containers at runtime and in the case of Docker containers – images become containers when they run on Docker Engine.
To understand you can think of an image is a snapshot of a container. That means, an image is read only system where everything is packaged for running an application. where container is an instance of that image.
To create a container, we can execute docker run command. like
$ docker run hello-world
By this command we’ve created a new container from “hello-world” image. If you want to see all the running containers, run this command
$ docker ps
You will see something like this
$ docker ps

CONTAINER ID  IMAGE   COMMAND     CREATED     STATUS     PORTS       NAMES
There’s no container! But we just ran a container, what happened to that, right?
Hang on a moment. I’m here to explain. But before that run this command
$ docker ps -a
Now, you can see that container. Here you can see an auto generated container ID. The image the container is created from. The status is exited, for this container. That means the container ran but after executing the application, the application is exited. Container had nothing to execute so, docker is smart enough to stop the container as well. At last you can see NAMES for our container. The name is also automatically generated by docker. But we can specify our container name by ourselves. To do that we have to pass --name flag
$ docker run --name my-hello-world-container hello-world
Enough hello-world example. Let’s see something useful in our real life.
Running Tomcat in Docker
Let’s run Apache tomcat in docker container. If you search in docker hub for tomcat. You’ll see that there are bunch of image under tomcat repository. A repository is a collection of images. Like tomcat:latest, tomcat:jdk11-corretto, tomcat:jdk11-openjdk-slim. Here tomcat is the repository and after each colon(:) it’s the tag name. For keeping commands clean for now, I’m just using the latest tag.
$ docker run --name my-tomcat tomcat
You can see from the terminal that tomcat is running on port 8080. Now if you go to your browser and hit localhost:8080. You will see “This site can’t be reached”. That means nothing is running on port 8080!
I told you earlier, docker container runs on totally isolated environment. You’re trying to access your host machine’s 8080 port. But tomcat is running on my-tomcat container. So, you cannot access that like this. But there is a way, it calls PORT binding. You can bind your host machine port with container port by publishing port from container. To publish port you can add --publish or just -p flag when running the container.
$ docker run -p 8080:8080 --name my-another-tomcat tomcat
Now if you go to localhost:8080 you can see that tomcat is running.
Inside Docker Container
Can we access in docker container? Of course we can. Let’s go to my-another-tomcat container’s bash and see what’s inside that container. To do that we’ve to run this
$ docker exec -it my-another-tomcat /bin/bash
We are saying to execute (exec) my-another-tomcat container. Here we can use the container ID as well. Here I’ve passed -it flag for interactivity. It will make the container wait for the input in the the terminal. If you don’t pass this flag, the container will be executed but immediately you’ll be returned back to the host. Cause bash has nothing to execute. That’s why we passed -it flag. At the end I’m saying to run bash in the container. You’ll see something like this picture below.
We’re now inside the container. Here you can see it’s totally isolated environment. It has it’s own pid/mnt/net/user etc. Type exit to come back to the host machine.
Sopping a container
You can stop one or more container with docker stop command
Usage
$ docker stop [OPTIONS] CONTAINER [CONTAINER...]
So to stop my-another-tomcat container just run this command
$ docker stop my-another-tomcat
If you type docker ps -a, you’ll that the container is there. But status is exited.
Remove a container
You can remove one or more container with docker rm command
Usage
$ docker rm [OPTIONS] CONTAINER [CONTAINER...]
So to remove my-another-tomcat container just run this command
$ docker rm my-another-tomcat
If you didn’t stop the container. You won’t be able to remove the container. But if you want to remove the container forcefully you can pass -for --force flag with docker rm. In that case, the container will be stopped and removed.
If you type docker ps -a, you’ll not find the container. It’s been removed.
Docker commit (Create Image from Container)
You can create an Image from a container. It can be useful to commit a container’s file changes or settings into a new image. This allows you to debug a container by running an interactive shell, or to export a working dataset to another server.
Usage
$ docker commit [OPTIONS] CONTAINER [REPOSITORY[:TAG]]
The Docker Flow
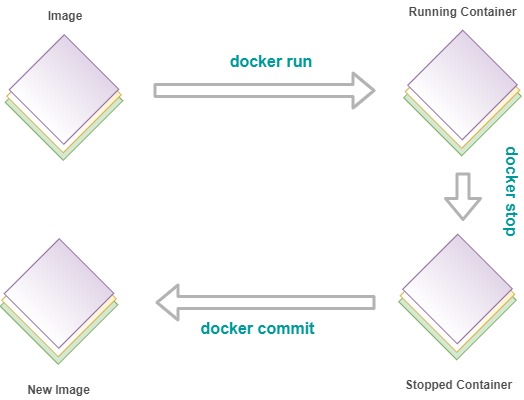
If we summarize the docker flow and try to visualize it, we’ll be ended up with something like this picture below
 The Docker Flow
We create a container from an Image. Image is the whole packaged thing for running our application. When we run an image, we get an instance or a container. We can stop the container. Also, we can commit the container and create a whole new image. So, it takes a snapshot of the container for the the image. If we change something in the container and commit the container, next time when we run the newly created image we get exact same changes in the container as well. Also, we can remove the containers.

 Docker for Java Developers | Running a simple Java App