How does our team use docker every day to build, test, run a mission-critical application
Before starting, I want to let you know that this article does not focus on the basics of containerization technologies like Docker, podman, containerd, etc. If you’re an absolute beginner, take a course on introductory docker. There are tons of articles and video tutorials available online to learn the basics of docker.
If you already know the basics of docker but wondering -
What’s the best process to follow, and how do people use docker in real life?
In this article, I’ll demonstrate how my team and I use docker in our daily life to deploy a mission-critical production-grade application.
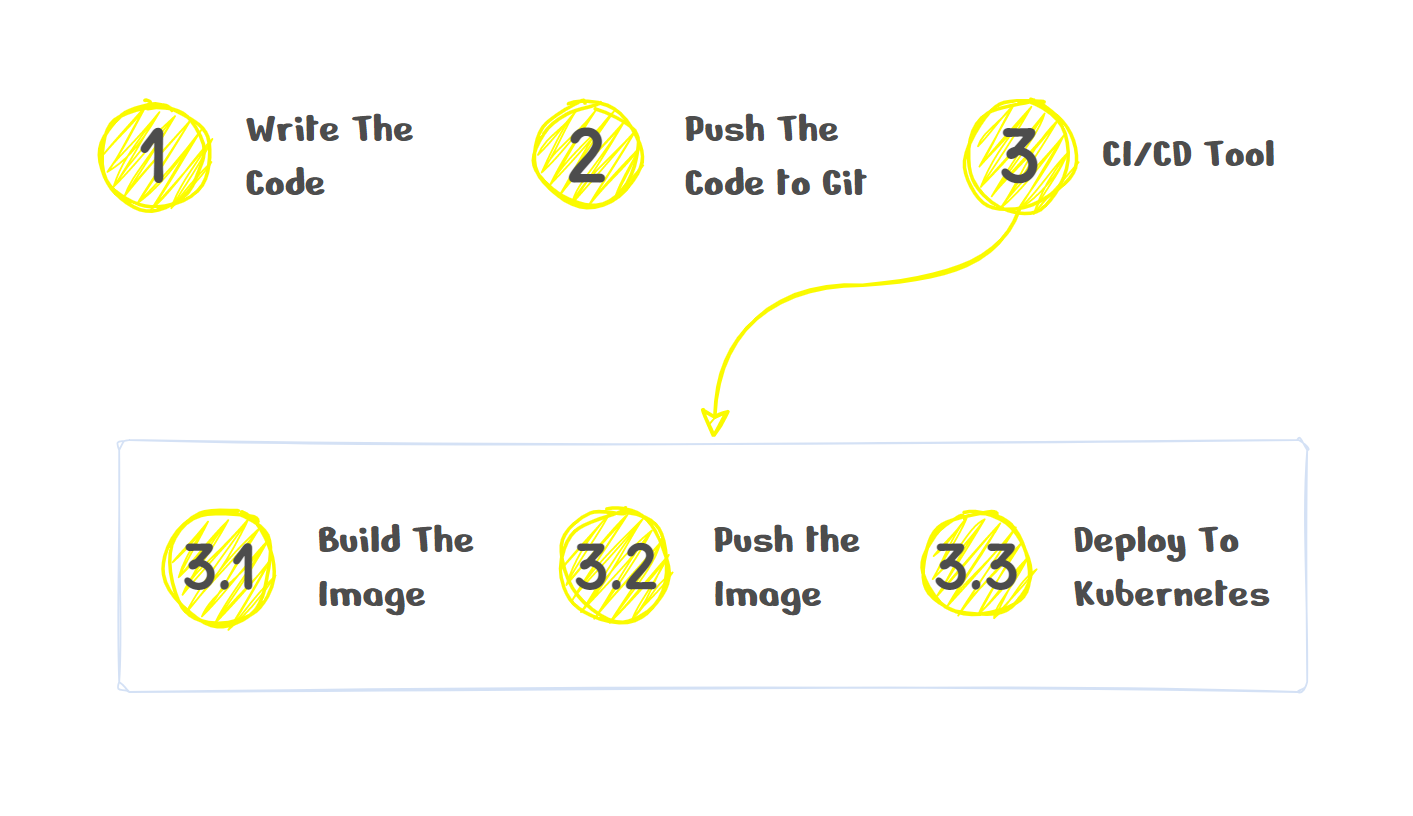
There are four main stages to deploy a container image to the production server.
- Write code
- Build docker container image
- Push docker image to docker registry (cloud/self-hosted)
- Deploy the container to the production server
1. Write Code (and run on your local machine)
Some people like to keep their development machines clean and write code to develop applications only using docker. That means your development machine won’t contain anything like Java, maven/grade, tomcat, etc. You write the code and keep a container running, all the changes you make appear in the container, and the container has all the necessary tools to build your code and run it.
But, some people, including me, don’t like this, so I moved from this strategy. Like I want to keep my development environment as it is. But if you’re someone who likes to use docker while developing the application, you can do so. But be aware that you might need to integrate the workflow with your favorite IDE. A simple example would be that running the application in debugging mode won’t just help you debug. You need to enable remote debugging if you run the source code inside a docker container.
My team uses their development machine to develop the application locally. Once the development part is done, then we containerize the source code to deploy it over the QA/Stage/Production environment. So the vital thing to remember is -
You don’t need to develop inside docker to deploy in docker.
To develop your application, you need external dependencies installed on your machine, like a database server, for instance. That’s where you can utilize the power of docker. Let’s say you require MongoDB, ActiveMQ, and a storage server to develop your code. You can run those external dependencies in docker containers. I use - docker-compose in this situation where multiple containers need to be run in my local machine. Here is an example.
docker-compose.yml
services:
  activemq:
    image: dsi/activemq
    ports:
      - 8161:8161
      - 61616:61616

  mongodb:
    image: mongodb
    ports:
      - 27017:27017

  openstackswift:
    image: dsi/swiftserver
    ports:
      - "8888:8888"
Notice the container port binding with the host, and I can directly connect to any of these containers using the ports even though my source code is outside the docker container. This is amazing. All I need is one command docker-compose up -d to make my external dependencies ready in my development environment. We keep this docker-compose.yml file in our source code. When a new developer joins our team, s/he doesn’t need to care about installing an ActiveMQ server or an OpenStack Swift server. All s/he needs to execute a single docker-compose up command, and their development environment is ready.
2. Build Docker container image
Once the development is done, it’s time to build a container image out of it. Some people like to make artifacts, like a jar or war inside docker, while building the executable container image. But some people want to build the artifact and then create the container image. Both approaches work just fine. To make a container image, there are multiple ways to do it. You can write a Dockerfile and build the image using the docker build command or a third-party tool.
There are some trendy tools to build container images, like
-
Jib (You don’t need to write a
Dockerfileor even install docker on your system if you want to do so) -
fabric8io maven plugin (You don’t need to write a
Dockerfile,but docker needs to be installed in your system) -
Spotify maven plugin (You need a
Dockerfileand installdockerin your host) -
spring-boot-maven-plugin (If you’re a spring developer, spring has a plugin to build docker image)
All of them are great, but I like to keep the container image build instruction in a Dockerfile. There is another article of mine where I’ve discussed the best practices to build a docker image. Check it out.
3. Push docker image
You’ve built your docker image. Now what? You need to send the container image to the server where you want to deploy the application, or you want to share the image with an SQA engineer in your team. But how would you do it?
When you create a docker image, you can’t see any file gets created that you can copy to the deployment server or someone else’s computer. All you can do is see the image on your computer using docker image ls or docker images command.
But you can extract the docker image to a .tar file which you can share with others. Here’s how
Step 1: Save the docker image as a tar file
docker save -o <path/to/the/generated/file> <image name>
Example
docker save -o /tmp/myapp.tar myapp:1.0.0
Step 2: Copy the tar file to another computer and load the file using docker.
docker load -i <path/to/the/tar/file>
Example
docker load -i /tmp/myapp.tar
If you execute the command docker images, you’ll find the image listed in your remote machine.
But copying files manually isn’t a convenient solution. If you have multiple QAs in your team or production environment, you might have multiple servers, and then you’ve to copy it over to numerous computers. That’s where registries come into the picture, and it’s the most common way to share docker images. A registry is just an intermediary server where all the images are stored. As a developer, you will build the docker image and push the image in the registry using the docker push <image> command. Those who want to use the image need to pull it using the docker pull <image> command. Docker hub is a very popular registry that you might already know. But if you’re working on a private project and keep the image confidential and only in your system, then, you can use the following alternatives:
Self-hosted registry: Harbor, Artifactory
Public cloud providers: Google Cloud’s Container Registry Amazon’s Elastic Container Registry (ECR)
We use Harbor in our team, and it’s excellent so far. But you can choose any of the above, all of them are heavily used in industries.
4. Deploy the container image to Server (Stage/Production Server)
The final step is to deploy the application so that end users can use it. You can use systemd to run the docker container or use docker-compose to run the containers. Here is an example systemd script for a tomcat container running in Ubuntu.
/etc/systemd/system/tomcat.service
[Unit]
Description=Tomcat Container
After=docker.service
Requires=docker.service

[Service]
TimeoutStartSec=0
Restart=always
ExecStartPre=-/usr/bin/docker stop tomcat
ExecStartPre=-/usr/bin/docker rm tomcat
ExecStartPre=/usr/bin/docker pull tomcat
ExecStart=/usr/bin/docker run -p 8080:8080 --rm --name tomcat tomcat

[Install]
WantedBy=multi-user.target
But this is not a very convenient solution for a production environment if you want 24/7 with zero downtime. If you’re going to update the application with a new version, there will be downtime in the above solution. Also, you can’t scale your application according to your need. So the recommended way is to use an orchestration tool like Docker Swarm or Kubernetes.
But, these tools do come with some added complexity. If 24/7 zero downtime or on-demand scale is not your primary concern, then you can stick to the above solution. We did it for a specific time, and many others are still doing it happily.
Using CI/CD Tools
Building artifact, building docker image, pushing it to the repository, and deploying the container image in the production server can be error-prone and time-consuming tasks. So many teams, including us, like CI/CD tools like Travis CI, GitLab CI, Circle CI, Jenkins, etc.
The developer pushes the code in their version control system like Git, then the CI/CD tools, pick up those changes, and takes care of the rest like the test, build, push, and deploy.

Summary
You’re reading the summary that generally means you’ve read the whole article. You’re fantastic kudos to you. Docker is something you can’t learn just by reading some articles or watching a few video tutorials. You’ve to make your hands dirty. Build something, containerize it, share your images with others, deploy it. You may find some challenges, learn from your mistakes and keep learning.

 Best practices to build a Java container with Docker